
Training a deep neural network model could take quite some time, depending on the complexity of your model, the amount of data you have, the hardware you're running your models on, etc. On most of the occasions you'll need to save your progress to a file, so in case of interruption (or a bug), you'll be able to continue where you left off.
Even more, after a successful training you'll surely need to re-use the model's learned parameters to make predictions on new data. This is the case for any deep learning platform, as for TensorFlow.
In this post we look at saving and restoring a TensorFlow model, which we describe some of the most useful options on the way, and provide some examples.
Quick Introduction of the TensorFlow Model
TensorFlow's main functionality is delivered through tensors - its basic data structure similar to multi-dimensional arrays in NumPy, and graphs - representing the computations on data. It's a symbolic library, meaning that defining a graph and tensors would only create a model, while tensors obtain concrete values and operations get executed within a session - a mechanism for executing the modeled operations in a graph. Any concrete values of the tensors are lost when a session is closed, which is another reason to save your models to a file after a session is run.
It's always easier to understand through examples, so let's create a simple TensorFlow model for linear regression of two-dimensional data.
First, we'll import our libraries:
import tensorflow as tf
import numpy as np
import matplotlib.pyplot as plt
%matplotlib inline
Next step is to create the model. We'll generate a model that will estimate the horizontal and vertical shift of a quadratic function in the form:
y = (x - h) ^ 2 + v
where h and v are the horizontal and vertical shifts.
The following lines generate the model (see comments in the code for more details):
# Clear the current graph in each run, to avoid variable duplication
tf.reset_default_graph()

# Create placeholders for the x and y points
X = tf.placeholder("float")
Y = tf.placeholder("float")

# Initialize the two parameters that need to be learned
h_est = tf.Variable(0.0, name='hor_estimate')
v_est = tf.Variable(0.0, name='ver_estimate')

# y_est holds the estimated values on y-axis
y_est = tf.square(X - h_est) + v_est

# Define a cost function as the squared distance between Y and y_est
cost = (tf.pow(Y - y_est, 2))

# The training operation for minimizing the cost function. The
# learning rate is 0.001
trainop = tf.train.GradientDescentOptimizer(0.001).minimize(cost)
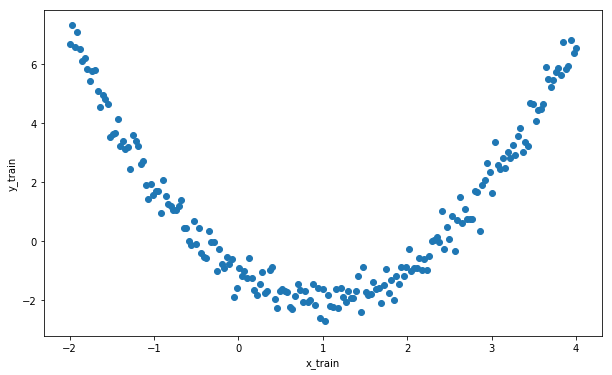
At this point we have the model which needs to be run in a Session, passing to it some real data. Let's generate some example quadratic data and add noise to it.
# Use some values for the horizontal and vertical shift
h = 1
v = -2

# Generate training data with noise
x_train = np.linspace(-2,4,201)
noise = np.random.randn(*x_train.shape) * 0.4
y_train = (x_train - h) ** 2 + v + noise

# Visualize the data
plt.rcParams['figure.figsize'] = (10, 6)
plt.scatter(x_train, y_train)
plt.xlabel('x_train')
plt.ylabel('y_train')
The Saver class
The Saver class provided by the TensorFlow library is the recommended way for saving the graph's structure and variables.
Saving Models
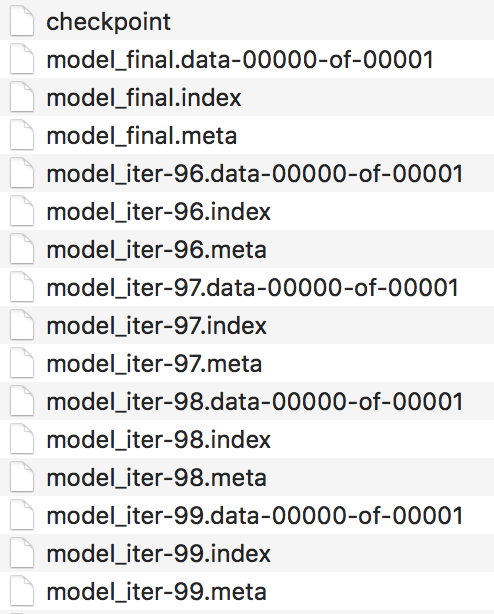
In the following few lines, we define a Saver object and within the train_graph() method we go through 100 iterations to minimize the cost function. The model is then saved to disk in each iteration, as well as after the optimization is finished. Each saving creates binary files on disk called "checkpoints".
# Create a Saver object
saver = tf.train.Saver()

init = tf.global_variables_initializer()

# Run a session. Go through 100 iterations to minimize the cost
def train_graph():
    with tf.Session() as sess:
        sess.run(init)
        for i in range(100):
            for (x, y) in zip(x_train, y_train):

                # Feed actual data to the train operation
                sess.run(trainop, feed_dict={X: x, Y: y})

            # Create a checkpoint in every iteration
            saver.save(sess, 'model_iter', global_step=i)

        # Save the final model
        saver.save(sess, 'model_final')
        h_ = sess.run(h_est)
        v_ = sess.run(v_est)
    return h_, v_
Now let's train the model with the above function and print out the learned parameters.
result = train_graph()
print("h_est = %.2f, v_est = %.2f" % result)
$ python tf_save.py
h_est = 1.01, v_est = -1.96
Okay, the parameters were pretty accurately estimated. If we check our filesystem, there are files saved for the last 4 iterations, as well as the final model.
When saving the model, you'll notice that it takes 4 types of files to save it:
- ".meta" files: containing the graph structure
- ".data" files: containing the values of variables
- ".index" files: identifying the checkpoint
- "checkpoint" file: a protocol buffer with a list of recent checkpoints
Check out our hands-on, practical guide to learning Git, with best-practices, industry-accepted standards, and included cheat sheet. Stop Googling Git commands and actually learn it!
Figure 1: Checkpoint files saved to disk
Calling the tf.train.Saver() method, as shown above, would save all variables to a file. Saving a subset of your variables is possible by passing them as an argument through a list or a dict, for example: tf.train.Saver({'hor_estimate': h_est}).
A few other useful arguments of the Saver constructor, which enable control of the whole process, are:
max_to_keep: maximum number of checkpoints to keep,keep_checkpoint_every_n_hours: a time interval for saving checkpoints
For more information, check out the official documentation for the Saver class, which offers other useful argumets you can explore.
Restoring Models
The first thing to do when restoring a TensorFlow model is to load the graph structure from the ".meta" file into the current graph.
tf.reset_default_graph()
imported_meta = tf.train.import_meta_graph("model_final.meta")
The current graph could be explored using the following command tf.get_default_graph(). Now, the second step is to load the values of variables.
A reminder: values only exist within a session.
with tf.Session() as sess:
    imported_meta.restore(sess, tf.train.latest_checkpoint('./'))
    h_est2 = sess.run('hor_estimate:0')
    v_est2 = sess.run('ver_estimate:0')
    print("h_est: %.2f, v_est: %.2f" % (h_est2, v_est2))
$ python tf_restore.py
INFO:tensorflow:Restoring parameters from ./model_final
h_est: 1.01, v_est: -1.96
As mentioned earlier, this approach saves only the graph structure and the variables, which means the training data that's input through our placeholders 'X' and 'Y' is not saved.
Anyway, for this example we'll use our training data defined out of tf, and visualize the model fit.
plt.scatter(x_train, y_train, label='train data')
plt.plot(x_train, (x_train - h_est2) ** 2 + v_est2, color='red', label='model')
plt.xlabel('x_train')
plt.ylabel('y_train')
plt.legend()
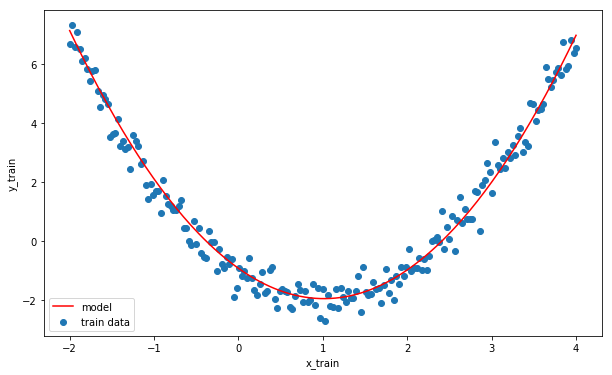
As a bottom line for this part, the Saver class allows an easy way to save and restore your TensorFlow model (graph and variables) to/from a file, and keep multiple checkpoints of your work which could be useful to try your model on new data, continue training it, and further fine-tuning.
The SavedModel Format
One new approach to saving and restoring a model in TensorFlow is to use the SavedModel, builder, and loader functionality. This actually wraps the Saver class in order to provide a higher-level serialization, which is more suitable for production purposes.
While the SavedModel approach seems to not be entirely accepted by developers yet, its creators point out that it's clearly the future. Compared to the Saver class, which focuses mainly on variables, SavedModel tries to encompass many useful features into one package, such as Signatures, which allow saving of graphs that have a set of inputs and outputs, and Assets containing external files used in initialization.
Saving Models with SavedModel Builder
The saving of a model is done using the SavedModelBuilder class. In our example we don't use any signatures or assets, but it's enough to illustrate the process.
tf.reset_default_graph()

# Re-initialize our two variables
h_est = tf.Variable(h_est2, name='hor_estimate2')
v_est = tf.Variable(v_est2, name='ver_estimate2')

# Create a builder
builder = tf.saved_model.builder.SavedModelBuilder('./SavedModel/')

# Add graph and variables to builder and save
with tf.Session() as sess:
    sess.run(h_est.initializer)
    sess.run(v_est.initializer)
    builder.add_meta_graph_and_variables(sess,
                                       [tf.saved_model.tag_constants.TRAINING],
                                       signature_def_map=None,
                                       assets_collection=None)
builder.save()
$ python tf_saved_model_builder.py
INFO:tensorflow:No assets to save.
INFO:tensorflow:No assets to write.
INFO:tensorflow:SavedModel written to: b'./SavedModel/saved_model.pb'
Running this code you'll notice that our model is saved to the file located at "./SavedModel/saved_model.pb".
Restoring Models with SavedModel Loader
The model restoring is done using the tf.saved_model.loader and restores the saved variables, signatures, and assets in the scope of a session.
In the following example, we'll load the model and print out the values of our two coefficients h_est and v_est.
with tf.Session() as sess:
    tf.saved_model.loader.load(sess, [tf.saved_model.tag_constants.TRAINING], './SavedModel/')
    h_est = sess.run('hor_estimate2:0')
    v_est = sess.run('ver_estimate2:0')
    print("h_est: %.2f, v_est: %.2f" % (h_est, v_est))
$ python tf_saved_model_loader.py
INFO:tensorflow:Restoring parameters from b'./SavedModel/variables/variables'
h_est: 1.01, v_est: -1.96
And again, as expected, our model was successfully restored with the correct trained parameters.
Conclusion
Saving and restoring a TensorFlow model is a very useful feature, knowing that training of deep networks can take a long time. The subject is too broad to be covered in details in a single blog post, so we may revisit it in a future post.
Anyway, in this post we introduced two tools: the basic Saver class which saves the model in a form of checkpoints, and the SavedModel builder/loader which builds on top of Saver and creates a file structure which is easy to use in production. A simple linear regression was used to illustrate the examples.

