
Introduction
When developing web applications with Vue.js, unless you're building a Single-Page Application (SPA), you'll want to connect multiple pages to a landing page to allow users to navigate through them. This is known as routing.
Routing is the process by which a user is navigated to different pages on a website. Vue.js is a JavaScript framework used to create Single Page Apps, which means that this application is only loaded once from the server to the browser, and the browser does not need to reload when routing; instead, it simply requests these pages and they are loaded.
In this guide, we will learn how to do routing with Vue.js and take a deep dive into the various types of routing that can be done and how they can be done. We will also learn how to use Vue Router to navigate between pages and how to use named routes, dynamic routes, and redirects.
Getting Started
Routing in Vue.js is done with Vue Router, which works in tandem with the core Vue library to allow us to set up a routing system. We would like to use vue-router in two scenarios in our project. We either want to use the router in an existing project or add it while creating a new project.
Setup Vue Router In Existing Project
Integrating vue-router into an existing project can be technical, and we will go over these details now. The first step would be to install the vue router package using the following command:
$ npm install vue-router@4
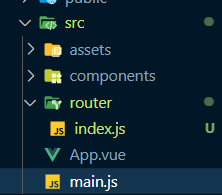
Once installed, navigate to the src folder and create a folder called router, followed by a file called index.js in the router folder, which will serve as our router configuration file. Our src directory will now look like this:
In the index.js file, let’s ensure that we paste the code below, which is the router configuration code:
import { createRouter, createWebHashHistory } from 'vue-router'
import HomePage from '../views/HomePage.vue'

const routes = [
   {
      path: '/',
      name: 'home',
      component: HomePage
   },
]

const router = createRouter({
   history: createWebHashHistory(),
   routes
})
export default router
We have a routes array that contains a single object, which could be multiple objects where each object represents a single route. For the time being, we only created the one that would redirect to the homepage component.
Each of these routes objects is typically composed of the path, which is the URL path relative to the site's root, the name, which serves as an identifier, and the component, which we imported at the top of the page.
Aside from the route array, we set up the router instance at the bottom by creating a createRouter() function and passing in the history key values and the routes array, and then we export the router instance for use within our application.
To use this router configuration within our application, open the main.js file in the src folder, import router from "./router", and then add .use(router) between createApp(App) and .mount('#app') just as it is below:
import router from './router'

createApp(App).use(router).mount('#app')
This vue-router has been globally configured within our application, and the next step is to use it within our application. This is easily accomplished by including <router-view /> within the App.js template tag, which renders only the matched route:
<!--App.vue -->
<template>
<!-- Any code placed here is going to be fixed -->
<!-- This will only show the page that matches the selected route -->
   <router-view />
<!-- Any code placed here is going to be fixed -->
</template>

<script>
   export default {
      name: 'App',
   }
</script>
Setting Up Routes In Vue.js
Routes are usually created in the router/index.js file's routes array, and these routes connect to components. It is a good practice to create a views folder where all page views will be stored. For example:

At this point we now know how to set up routes manually.
Note: All of this will be done for us if we use the vue-cli to install vue-router when creating our project. If you're using the vue-cli, you can skip the next section.
Install Vue Router With Vue CLI
If we are about to create a new project and believe that we'll make use of vue-router, it is easier to do so while creating the project.
All we have to do is use Vue CLI to install the most recent version of vue-router while manually selecting features in the process of creating our project:

Read and learn more about creating Vue.js project via our Guide to the Vue CLI!
Lazy Loading Routes With Vue Router
As our application grows in size, the bundle size grows, causing our site to take longer to load. We can use vue-router to implement lazy loading to avoid loading some specific routes until the user specifically requests them. This way, the user will only load the components they need, which will improve the performance of our application.
This is typically accomplished in the router configuration file by removing the import statement at the top and replacing it with a dynamic import statement in the component option of our route:
import { createRouter, createWebHashHistory } from 'vue-router';
const routes = [
   {
      path: '/',
      name: 'home',
      component: () =>
         import(/* webpackChunkName: "home" */ '../views/HomePage.vue'),
   },
   {
      path: '/about',
      name: 'about',
      component: () =>
         import(/* webpackChunkName: "about" */ '../views/AboutPage.vue'),
   },
];
const router = createRouter({
   history: createWebHashHistory(),
   routes,
});
export default router;
Navigating Between Routes With <router-link>
So far, we've been able to create routes, but how do we navigate within our application? We use the <router-link> tag instead of the <a> element in HTML to handle routing.
For example, if we want to create a navigation bar at the top of our application, we could do this in the App.js file above the <router-view/> tag so it shows on all routes:
<nav>
   <router-link to="/">Home</router-link> |
   <router-link to="/about">About</router-link>
</nav>
Check out our hands-on, practical guide to learning Git, with best-practices, industry-accepted standards, and included cheat sheet. Stop Googling Git commands and actually learn it!
The router-link accepts the to='path' attribute that takes the user to the path of the component that was set when configuring the route. This works like the href='path``' attribute in HTML.
Using Named Routes
Using named routes allows us pass in the name key that has access to the name property which we set while configuring the routes instead of using the path by binding the data this way:
<router-link :to="{ name: 'About' }">About</router-link>
One advantage of using this method is that in case we decide to change the route path for our large applications, we don’t need to start changing all link paths which could be cumbersome.
Dynamic Routing
Situations may arise that necessitate the use of dynamic routing to avoid unnecessary page repetition. For example, suppose we have a list of fruits and we want a user to be able to click on a specific fruit and only details about that fruit are displayed on a fruit-details page. In this case, we use dynamic routing to avoid unnecessary page repetition.
We'd have two pages - one to showcase the fruits in a list and one to show the details of each fruit, which is a "blueprint" page to be populated with the fruit's details. We'll create the pages in the Vue folder and then add the routes to the routes array:
import FruitsPage from '../views/FruitsPage.vue';
import FruitDetails from '../views/FruitDetails.vue';

const routes = [
   {
      path: '/fruits',
      name: 'Fruits',
      component: FruitsPage,
   },
   {
      path: '/fruits/:id',
      name: 'FruitDetails',
      component: FruitDetails,
   },
];
We will notice that for the FruitDetails page, we added a dynamic id property so it gets the id parameter and uses it to query the particular data that shows on that page using $route.params in our template, thus making the route dynamic.
In the FruitsPage, suppose we have an array of fruits which we loop into our application, we can wrap each fruit with a link alongside params this way:
<!-- FruitsPage.vue -->

<template>
   <h1>Fruits page</h1>
   <div :key="fruit.id" v-for="fruit in fruits">
      // dynamic linking by attaching the id as params
      <router-link :to="{ name: 'FruitDetails', params: { id: fruit.id } }">
         <h3>{{ fruit.name }}</h3>
      </router-link>
   </div>
</template>

<script>
   export default {
      data() {
         return {
            fruits: [
               {
                  id: 1,
                  name: 'Apple',
                  description:
                     "Apples are an incredibly nutritious fruit.",
               },
               {
                  id: 2,
                  name: 'Mango',
                  description:
                     'A mango is an edible stone fruit produced by the tropical.',
               },
               {
                  id: 3,
                  name: 'Banana',
                  description:
                     'A banana is an elongated, edible fruit of the genus Musa.',
               },
            ],
         };
      },
   };
</script>
At this point when a user clicks each fruit, it will take them to the FruitDetails page where we can access the id parameter and use it to identify which fruit's details should be shown in the FruitDetails page.
Access the Route Parameters
So far we have seen how to pass down params to a particular page dynamically, let's now see how we can access that param in our FruitDetails page. There are a few ways we can access parameters in Vue - via $route.params or making use of props:
Using $route.params
The parameters are directly accessible via $route.params:
<template>
   <h1>Fruit Details</h1>
   <p>This is fruit with the id of {{ $route.params.id }}</p>
</template>
Or we can access it within our data() method using this:
<template>
   <h1>Fruit Details</h1>
   <p>This is fruit with the id of {{ id }}</p>
</template>

<script>
   export default {
      data() {
         return {
            id: this.$route.params.id,
         };
      },
   };
</script>
Using Vue Props
Another easy method to access data dynamically via routes is using props. We first have to set props to true in the routes configuration object:
{
   path: '/fruits/:id',
   name: 'FruitDetails',
   component: FruitDetails,
   props: true,
},
This way, all we have to do next is to add props option to the script tag and then make use of the props within our template tag:
<template>
   <h1>Fruit Details</h1>
   <p>This is fruit with the id of {{ id }}</p>
</template>

<script>
   export default {
      props: ['id'],
   };
</script>
404 Errors - No Found Route
In the event that a user navigates to a non-existent route, Vue will load the page but without any components, producing an empty page. In this case, the best thing to do is display a 404 page, with perhaps a button leading them to the homepage or wherever we believe they would like to go.
This is easily handled by creating a component for our 404 page and then adding a 404 route to our router configuration file's routes array, but this time we will use a regular expression to catch all routes that have not been declared previously:
{
   path: '/:catchAll(.*)',
   name: 'ErrorPage',
   component: ErrorPage,
}
The :catchAll is the dynamic segment which receives a regular expression of (.*) in which Vue Router uses to check if the route the user navigates to is defined in our router’s configuration file. If such routes do not exist, the user is directed to the component, which in our case is the ErrorPage component:
<template>
   <h2>404 Page</h2>
   <p>This is a 404 page</p>
   <p>Visit home page <router-link to="/">here</router-link></p>
</template>
Redirects
In a situation where we want users to be redirected when they visit a specific route, for example, if we had a former route that we no longer use, we want users to be redirected to the new one when they visit that route. This is easily accomplished by adding a new object to our routes configuration array, with a redirect field:
{
   path: '/fruits',
   name: 'Fruits',
   component: FruitsPage,
},
{
   path: '/all-frults',
   redirect: '/fruits',
},
All the code above does is that if a user visits, the path /all-fruits, it would redirect them to the /fruits route.
Programmatic Navigation
So far, we've learned a lot about routing, but there's one more thing you'll want to know: how to perform programmatic navigation. We define programmatic navigation as a situation in which a user is redirected/directed based on a specific action that occurs on a route, such as a login or signup action, or by clicking a specific button, such as a "go back" button.
Router History
We can use the browser history to easily navigate backwards or forwards, depending on what you want to do. If you recall, we have a createRouter() function in the router configuration file where we set a history value, allowing the Vue router to keep track of our router history as we route through the web application.
This allows us to traverse the browser's history, based on a conditional such as a button click:
<template>
   <h1>Fruit Details</h1>
   <p>This is fruit with the id of {{ id }}</p>
   <button @click="goBack">Go Back</button>
</template>

<script>
   export default {
      props: ['id'],
      methods:{
         goBack(){
            this.$router.go(-1)
         }
      }
   };
</script>
We can also decide to go forward by using the 1 instead of -1 and suppose we want to move by 2 steps we can use either 2 or -2. This will navigate the user to the previous or next page, respectively.
Push
push() is typically used after an action has occurred and adds a new entry to the history stack. For example, if a user signs in successfully, we would like to be navigated to the dashboard page programmatically. This is accomplished by including the push method alongside the route's name:
this.$router.push({ name: 'Dashboard' });
Note: We must ensure that route is declared in our router configuration file, otherwise it will not work and will redirect us to the 404 page.
Conclusion
Routing is one of the core functionalities of Vue. Unless you're building a Single-Page Application (SPA), you'll want to connect multiple pages to a landing page to allow users to navigate through them.
In this guide, we've taken a look at what routing is, how you can install the vue-router in new and existing projects, how to perform lazy loading, navigate between routes, perform dynamic routing, access route parameters and perform programmatic navigation.

