Introduction
In this tutorial, we are going to learn how to use OpenCV library in Python. OpenCV is an open source library which is supported by multiple platforms including Windows, Linux, and MacOS, and is available for use in multiple other languages as well; however, it is most commonly used in Python for Machine Learning applications, specifically in the Computer Vision domain.
Apart from its cross-platform support and availability in multiple other computer languages, which allows applications developed in it to be used on different systems, OpenCV is also, in comparison to other such libraries, fairly efficient in terms of computations, as it uses vector operations for most of its functions.
In this tutorial, we'll cover OpenCV installation on Mac, Windows, and Linux, image operations, image arithmetics, image smoothing, and geometric transformations using OpenCV. So without further ado, let's start.
Installation
Note: Since we are going to use OpenCV in the Python language, it is an implicit requirement that you already have Python (version 3) installed on your workstation. Depending upon your OS, execute one of the following commands to install OpenCV library on your system:
Windows
$ pip install opencv-python
MacOS
$ brew install opencv3 --with-contrib --with-python3
Linux
$ sudo apt-get install libopencv-dev python-opencv
To check if your installation was successful or not, run the following command in either a Python shell, or your command prompt/ terminal:
import cv2
If you do not get an error on importing cv2 then it was installed correctly.
Basic Image Operations
Now that we have installed OpenCV on our workstations, let's get our hands dirty with some of the functionalities that OpenCV offers.
Display an Image
Displaying an image using OpenCV is a two-step process; first, we have to load it, and then we can display it. Both operations are done in sequence using different functions.
To display an image, we need to know two things:
- Image Path (both absolute and relative paths work)
- Read Mode (read, write, etc.)
The function we'll use for reading/loading an image is cv2.imread(), which has two variations. First one is IMREAD_GRAYSCALE, which as the name suggests, converts the image to grayscale before reading it. The second one is IMREAD_UNCHANGED, which loads the image without cutting out the alpha channel. The default is IMREAD_COLOR, which simply reads the colored image using the RGB channels only.
Let's code an example:
import cv2

my_bike = cv2.imread('bike.png')
This will load the image of a bike from the file system and store it in the my_bike variable for further operations
Note: If you get an error from the above code, there are only three possible reasons for it. The first one is that the path you specified is incorrect, second is that the image file you specified doesn't exist, and the last one is that the image type (jpg/jpeg/png) in the image path is incorrect.
Let's now display the image we just read. It can be done by the cv2.imshow() function. If you have used Matlab, you may be familiar with these image operations.
cv2.imshow('my_bike', my_bike)
The first parameter to the imshow() function is the string name that you want to display on the image window. The second parameter is the image handler we created using the cv2.imread() function.
Saving an Image
Saving an image is a very commonly used feature, as we may need to update our image and save the changes to the file system for later use. OpenCV has an cv2.imwrite() function to save images.
Here is an example:
cv2.imwrite('bike.png', my_bike)
Here we specify the name and current location of the image. The resulting image is automatically saved in the current working directory.
Arithmetic Operations on Images
Arithmetic operations on images refer to adding, subtracting, multiplying, or dividing multiple images to generate a new image which is an arithmetic combination of the input images. Image arithmetics has a lot of applications, like adding a watermark to an image, creating a blended combination of two images, applying different types of image filters, etc.
While there are many operations you can perform, we will only be showing two examples here, as this will then allow you to apply the concept to other arithmetic operations available in OpenCV. The first example will be the addition of two images, and the second example will be blending two images.
Check out our hands-on, practical guide to learning Git, with best-practices, industry-accepted standards, and included cheat sheet. Stop Googling Git commands and actually learn it!
Let's code these two examples:
Adding Images
import cv2

# Read in the two images
image_1 = cv2.imread('bike.jpg')
image_2 = cv2.imread('car.jpg')

# Sum the two image arrays for all channels
result = cv2.add(image_1, image_2)

cv2.imshow('result', result)
cv2.waitKey(0)
cv2.destroyAllWindows()
The waitKey command will wait for you to press a key before it moves on to the next command. This is useful so that the program will continue to display your image until a key is pressed, otherwise it will be displayed for a split second and then quickly disappear once the program has stopped executing.
Blending Images
Blending images is similar to image addition, except each image's contribution to the new resulting image can be controlled. Basically, if we want one image to be more focused, and the other one to be more faint when they get merged, we will go with blending, instead of simple addition.
Lets code it to clarify further:
import cv2

# Read in the two images
image_1 = cv2.imread('bike.jpg')
image_2 = cv2.imread('car.jpg')

result = cv2.addWeighted(image_1, 0.9, image_2, 0.1)

cv2.imshow('result', result)
cv2.waitKey(0) # Wait for the user to press a key before continuing
cv2.destroyAllWindows()
The sum of the weights given to the addWeighted function should be equal to 1.0. You can also give a scalar value at the end, which would be added to all the pixel values of the resultant image.
Note: The images can be of any type; however, the type should be the same for all images. For instance, if you are using PNG format, all images being used for computation should be in PNG format as well.
Image Smoothing
Image smoothing is a very helpful feature, which is mostly performed before the images are passed on to a machine learning model. It is mostly done to remove noise/high-frequency elements from images by passing the image through a low-pass filter. There are many filters, including box filter (averaging filter), median filter, mode filter, Gaussian filter, and many more; however, to understand image smoothing and how to do it using OpenCV, we will only cover the box filter.
Let's say you have an image of 10x10, and you want to pass it through a 3x3 box/averaging filter, how would you do it?
You'll start with the top left of the image, place your 3x3 filter there, and replace the central element with the average of all 9 elements. This was the first step, now you will move your filter one step to the right, and repeat the same process until you have covered the whole image. An example of 10x10 image, and 3x3 averaging filter are shown below for your reference:
Filter/Mask:
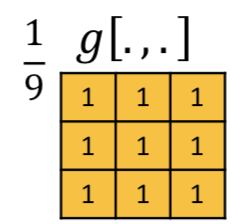
Filter being applied on 10x10 Image:

Now that we have discussed how it works, lets try and see how we can apply different filters on our image using OpenCV; please read the comments thoroughly to know which line of code is used for which filter:
import cv2

# Load the original image
original_image = cv2.imread('my_bike.png')

# Filter by passing image through 3x3 averaging filter
average_image = cv2.blur(original_image,(3,3))

# Apply 3x3 gaussian filter on the original image
gaussian_image = cv2.GaussianBlur((original_image,(3,3),0))

# Apply 3x3 median filter on the original image
median_image = cv2.medianBlur(original_image,3)
Note: You can view the resulting images by using the following additional code:
import matplotlib.pyplot as plt

plt.imshow(average_image)
plt.show()
Image Transformations
Image transformation is the last, but one of the most important topics that we are going to cover with OpenCV. It has a lot of applications, but one of the most common ones nowadays is in Machine Learning for Data Augmentation, i.e. when you have a shortage of dataset, you augment/transform the currently available images to make them different from your existing dataset. This effectively increases your dataset size and might help in improving your model accuracy.
The list of possible transformations is a long one, including scaling, affine, rotation, translation, etc. We will only cover two of them using OpenCV to get a general idea; however, OpenCV provides supporting functions for a wide range of them. Let's start with scaling.
Scaling
To put it in simple words, scaling is basically just resizing your image, i.e. either making it bigger or smaller. resize is the function used for scaling the images in OpenCV. Resizing has three types: INTER_CUBIC, INTER_LINEAR, and INTER_AREA. Let's code an example using these functions for scaling; please read through the code, comments, and descriptions carefully as they will explain what exactly is going on in the code:
import cv2
import numpy as np
import matplotlib.pyplot as plt

image = cv2.imread('my_bike.jpg')

# Scale up/expand both width and height by factor of 2
result_1 = cv2.resize(image, None, fx=2, fy=2, interpolation=cv2.INTER_CUBIC)

# Scale down/shrink both width and height by factor of 2
result_2 = cv2.resize(image, None, fx=2, fy=2, interpolation=cv2.INTER_AREA)

# Display the resulting images
plt.imshow(result_1)
plt.imshow(result_2)
plt.show()
Here in the resize function, the fx parameter in represents the scale factor for width, fy represents the scale factor height, and interpolation specifies the function to be used for scaling (shrinking or expansion).
Rotation
Rotation allows us to move an image about the axis for a certain specified angle.
Before we learn how to rotate our images using code, we should know that there is a rotation matrix that is used for performing this transformation; we will not go in details of that, as OpenCV makes it very simple for us to calculate that matrix using a single function call. You will see that in the code below:
import cv2
import matplotlib.pyplot as plt

# Load the image of a bike
image = cv2.imread('my_bike.jpg',0)

# Rows and columns
r, c = image.shape

matrix = cv2.getRotationMatrix2D((cols/2,rows/2), 180, 1)
result = cv2.warpAffine(image,matrix,(c,r))

# Display resulting rotation
plt.imshow(result)
plt.show()
In the getRotationMatrix2D function, 180 specifies the degree by which the image should be rotated, 1 is the scaling factor, the function call would return the rotation matrix in the matrix variable.
The warpAffine function call uses the matrix we calculated from the previous method to rotate the image according to our specifications.
Conclusion
To conclude it all, let's reiterate over some important points that we discussed in this article. OpenCV is a library available in multiple languages and is mostly used in conjunction with NumPy, SciPy and Matplotlib, as we saw in some of the examples above, as well. Some of its functions are the same as in Matlab, and it also supports vectorized operations, hence increasing computational efficiency.
Furthermore, OpenCV is one of the best libraries out there for the Computer Vision domain, and after reading this article, you should be able to go ahead and search up some computer vision / machine learning applications that have been developed using OpenCV.
Let it be known that this article was just the tip of the iceberg, and OpenCV has a lot more to offer. Reading this should enable you to dive deeper and learn about other advanced features that OpenCV has to offer.

