Introduction
JUnit is a popular testing framework for Java. Simple use is very straightforward and JUnit 5 brought some differences and conveniences compared to JUnit 4.
The test code is separate from the actual program code, and in most IDEs the testing results/output are also separate from the program's output, providing a readable and convenient structure.
Installing JUnit 5
Installing JUnit is as simple as including the dependencies:
<dependency>
    <groupId>org.junit.jupiter</groupId>
    <artifactId>junit-jupiter-api</artifactId>
    <version>5.4.0-RC1</version>
    <scope>test</scope>
</dependency>
<dependency>
    <groupId>org.junit.jupiter</groupId>
    <artifactId>junit-jupiter-engine</artifactId>
    <version>5.4.0-RC1</version>
    <scope>test</scope>
</dependency>
You can choose to simply create the testing classes in the same folder as the rest of your code, but it's recommended to have a separate directory for tests. Another thing to note is the naming conventions. If we wish to fully test our code, each class should have a corresponding test class named - [classname]Test.
Generally, a recommended project structure is:

Note: It's highly recommended that you import JUnit5 using the static modifier, it will make using the methods provided a lot cleaner and more readable.
Differences Between JUnit 4 and JUnit 5
One of the main ideas behind the new JUnit version is utilizing the features Java 8 brought to the table (mainly lambdas) to make everybody's life easier. Some minor things have been changed - the optional message that an assertion would be printed if it failed is now the last, "optional" argument, instead of inconveniently being the first.
JUnit 5 consists of three projects (JUnit Platform, JUnit Jupiter, and JUnit Vintage) so there'll be several different imports - although, JUnit Jupiter will be our main focus.
Some other differences include:
- The minimum JDK for JUnit 4 was JDK 5, while JUnit 5 requires at least JDK 8
- The
@Before,@BeforeClass,@After, and@AfterClassannotations are now the more readable as the@BeforeEach,@BeforeAll,@AfterEach, and@AfterAllannotations @Ignoreis now@Disable@Categoryis now@Tag- Support for nested testing classes, and an added test factory for dynamic tests
The @Test Annotation
We'll use a simple calculator class to demonstrate the basic capabilities of JUnit. For now, our Calculator class looks like this:
public class Calculator {
    float add(float a, float b) {
        return a + b;
    }

    int divide(int a, int b) {
        return a/b;
    }
}
It doesn't do anything special but it will let us go through the motions of testing. As per the naming conventions, the CalculatorTest class is born:
class CalculatorTest {

    @Test
    void additionTest() {
        Calculator calc = new Calculator();
        assertEquals(2, calc.add(1,1), "The output should be the sum of the two arguments");
    }
}
The @Test annotation tells the JVM that the following method is a test. This annotation is necessary before every testing method.
The method assertEquals() and all "assertion" methods work similarly - they assert (i.e. make sure) that whatever we're checking is true. In this case we're asserting that the two arguments we passed are equal (see the Note below), in case they aren't - the test will fail.
The first argument is generally the expected return value and the second is the actual return value of the method we're testing. If these two are equal, the assertion is pleased and the test passes.
The third argument is optional but highly recommended - it's the custom message that'll appear when a test doesn't go as it should. It might not matter with small programs but it's good practice to add these messages so whoever works with your code later (or a future you) can easily figure out what didn't work.
We run the tests by simply running the CalculatorTest class (we can do that even though it doesn't have a main method):

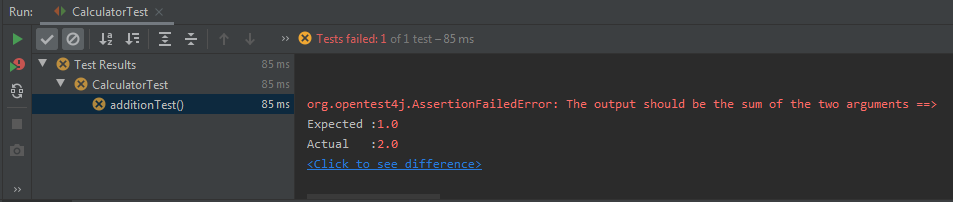
If we changed the assertEquals() line to something that wasn't correct, like:
assertEquals(1, calc.add(1,1), "The output should be the sum of the two arguments");
We'll get an adequate test failure message:
Note: It's very important to understand that assertEquals() actually uses the .equals() method and not the == operator. There's a separate JUnit method called assertSame() that uses == instead of .equals().
Assertion Methods
JUnit 5 comes with many assertion methods. Some of them are just convenience methods that can be easily replaced by an assertEquals() or assertSame() method. However, it's recommended to use these convenience methods instead, for readability and ease of maintenance.
For example, the call assertNull(object, message) can be replaced with assertSame(null, object, message), but the former form is recommended.
Let's take a look at the assertions at our disposal. They're generally pretty self-explanatory:
-
assertEquals()andassertNotEquals() -
assertSame()andassertNotSame() -
assertFalse()andassertTrue() -
assertThrows()asserts that the method will throw a given exception, when faced with the return value of the tested method -
assertArrayEquals(expectedArray, actualArray, optionalMsg)compares the two arrays and passes only if they have the same elements at the same positions, otherwise it fails. If both arrays arenull, they are considered equal. -
assertIterableEquals(Iterable<?> expected, Iterable<?> actual, optionalMsg)makes sure that expected and actual iterables are deeply equal. Since this method takes anIterableas the two arguments, the iterables we pass don't need to be of the same type (we can pass aLinkedListand anArrayList, for example). However, their iterators must return equal elements in the same order as each other. Again, if both arenull, they are considered equal. -
assertLinesMatch(List<String> expected, List<String> actual, optionalMsg)is a slightly more complex method, since it takes several steps before declaring that the passed arguments are not equal and works only withStrings:- It checks whether
expected.equals(actual)returnstrue, if it does, it proceeds to the next entries. - If Step 1 doesn't return
true, the currentexpectedstring is treated like a regular expression, so the method checks whetheractual.matches(expected)and if it does, it proceeds to the next entries. - If neither of the two steps above return
true, the last attempt the method makes is to check whether the next line is a fast-forward line. A fast-forward line starts and ends with ">>", between which are either an integer (skips the number of designated lines) or a string.
- It checks whether
-
<T extends Throwable> T assertThrows(Class<T> expectedType, Executable exec, optionalMsg)checks that execution ofExecutablethrows an exception of theexpectedTypeand returns that exception. If no exception is thrown or if the exception thrown isn't of theexpectedType- the test fails. -
assertTimeout(Duration timeout, Executable exec, optionalMsg)checks that theexeccompletes it's execution before the given timeout is exceeded. Since theexecis executed in the same thread as that of the calling code, the execution won't be preemptively aborted if the timeout is exceeded. In other words - theexecfinishes its execution regardless of thetimeout, the method simply checks afterwards whether it executed quickly enough. -
assertTimeoutPreemptively(Duration timeout, Executable exec, optionalMsg)checks that execution ofexeccompletes before the given timeout is exceeded but unlike theassertTimeoutmethod, this method executes theexecin a different thread and it will preemptively abort the execution if the providedtimeoutis exceeded. -
assertAll(Executable... executables) throws MultipleFailuresErrorandassertAll(Stream<Executable> executables) throws MultipleFailuresErrordoes something very useful. Namely, if we wanted to use multiple assertions in one test (it's not necessarily bad if we do), something very annoying would happen if all of them went badly. Namely:@Test void additionTest() { Calculator calc = new Calculator(); assertEquals(100, calc.add(1,1), "Doesn't add two positive numbers properly"); assertEquals(100, calc.add(-1,1), "Doesn't add a negative and a positive number properly"); assertNotNull(calc, "The calc variable should be initialized"); }When the first assertion fails, we will not see how the other two went. Which can be especially frustrating, since you might fix the first assertion hoping that it would fix the entire test, only to find that the second assertion failed as well, only you didn't see it since the first assertion failing "hid" that fact:

assertAll()solves this issue by executing all the assertions and then showing you the failure even if multiple assertions failed. The rewritten version would be:@Test void additionTest() { Calculator calc = new Calculator(); assertAll( () -> assertEquals(100, calc.add(1,1), "Doesn't add two positive numbers properly"), () -> assertEquals(100, calc.add(-1,1), "Doesn't add a negative and a positive number properly"), () -> assertNotNull(calc, "The calc variable should be initialized") ); }Now we'll get a more informative testing result:

It's good to understand that
assertAll()basically checks whether any of the executables throw an exception, executing them all regardless, and all that do throw an exception are aggregated in theMultipleFailuresErrorthat the method throws. However, for serious issues, likeOutOfMemoryErrorthe execution will halt immediately and the exception will be rethrown as is but masked as an unchecked (runtime) exception.
Note: You may have noticed that the String optionalMsg is excluded from the method declarations. JUnit 5 provides a small optimization to the optionalMsg. We can, of course, use a simple String as our optionalMsg - however, regardless of how the test goes (whether it fails or not) Java will still generate that String, even though it might never get printed out. This doesn't matter when we do something like:
assertEquals(expected, actual, "The test failed for some reason");
But if we had something along the lines of:
assertEquals(expected, actual, "The test failed because " + (Math.sqrt(50) + Math.scalb(15,7) + Math.cosh(10) + Math.log1p(23)) + " is not a pretty number");
You really don't want something like that optionalMsg loading regardless of whether Java plans to print it out.
The solution is to use a Supplier<String>. This way we get to utilize the benefits of lazy evaluation, if you've never heard of the concept, it's basically Java saying "I will not calculate anything I don't need to. Do I need this String right now? No? Then I won't create it.". Lazy evaluation shows up several times in Java.
This can be done by simply adding () -> before our optional message. So that it becomes:
Check out our hands-on, practical guide to learning Git, with best-practices, industry-accepted standards, and included cheat sheet. Stop Googling Git commands and actually learn it!
assertEquals(expected, actual, () -> "The test failed because " + (Math.sqrt(50) + Math.scalb(15,7) + Math.cosh(10) + Math.log1p(23)) + " is not a pretty number");
This is one of the things that weren't possible before JUnit 5, because Lambdas weren't introduced to Java at the time and JUnit couldn't leverage their usefulness.
Testing Annotations
In this part we'll introduce some other annotations, besides the necessary @Test annotation. One thing we should understand is that for each test method, Java creates a new instance of the testing class.
It's a bad idea to declare global variables that are changed within different test methods, and it's an especially bad idea to expect any type of testing order, there are no guarantees in which order the test methods will be run!
Another bad idea is to have to constantly initialize the class we want to test if we don't have to. We'll see how to avoid that soon, but before that, let's take a look at the available annotations:
@BeforeEach: A method with this annotation is called before every test method, very useful when we want the test methods to have some code in common. The methods must have avoidreturn type, must not beprivate, and must not bestatic.@BeforeAll: A method with this annotation is called only once, before any of the tests are run, mostly used instead of@BeforeEachwhen the common code is expensive, like establishing a database connection. The@BeforeAllmethod must bestaticby default! It also must not beprivateand must have avoidreturn type.@AfterAll: A method with this annotation is called only once, after every test method has been called. Usually used to close connections established by@BeforeAll. The method must have avoidreturn type, must not beprivate, and must bestatic.@AfterEach: A method with this annotation is called after every test method finishes it's execution. The methods must have avoidreturn type, must not beprivate, and must not bestatic.
To illustrate when each of these methods is executed, we'll add some flavor to our CalculatorTest class, and while we're at it demonstrate the use of the assertThrows() method:
class CalculatorTest {

    Calculator calc;

    @BeforeAll
    static void start() {
        System.out.println("inside @BeforeAll");
    }

    @BeforeEach
    void init() {
        System.out.println("inside @BeforeEach");
        calc = new Calculator();
    }

    @Test
    void additionTest() {
        System.out.println("inside additionTest");
        assertAll(
            () -> assertEquals(2, calc.add(1,1), "Doesn't add two positive numbers properly"),
            () -> assertEquals(0, calc.add(-1,1), "Doesn't add a negative and a positive number properly"),
            () -> assertNotNull(calc, "The calc variable should be initialized")
        );
    }

    @Test
    void divisionTest() {
        System.out.println("inside divisionTest");
        assertThrows(ArithmeticException.class, () -> calc.divide(2,0));
    }

    @AfterEach
    void afterEach() {
        System.out.println("inside @AfterEach");
    }

    @AfterAll
    static void close() {
        System.out.println("inside @AfterAll");
    }
}
Which gives us the output of:
inside @BeforeAll

inside @BeforeEach
inside divisionTest
inside @AfterEach


inside @BeforeEach
inside additionTest
inside @AfterEach

inside @AfterAll
This also shows us that, despite the additionTest() method being declared first, it doesn't guarantee that it will be executed first.
Other Annotations
Prior to JUnit 5, the testing methods could not have any parameters, but now they can. We'll use them while demonstrating the new annotations.
@Disabled
A simple and useful annotation that simply disables any test method, i.e. the test will not be run and the testing output will show that the particular test was disabled:
@Disabled
@Test
void additionTest() {
    // ...
}
Gives the following output for that testing method:
void main.CalculatorTest.additionTest() is @Disabled
@DisplayName
Another simple annotation that changes the displayed name of the testing method.
@DisplayName("Testing addition")
@Test
void additionTest() {
    // ...
}
@Tag
The @Tag annotation is useful when we want to create a "test pack" with selected tests. Tags are used to filter which tests are executed:
class SomeTest {
    @Tag("a")
    @Test
    void test1() {
        // ...
    }
    @Tag("a")
    @Test
    void test2() {
        // ...
    }
    @Tag("b")
    @Test
    void test3() {
        // ...
    }
}
So if we wanted to run only tests that have the "a" tag, we'd go to Run -> Edit Configurations, and change the following two fields before running the test:

@RepeatedTest
This annotation works the same as the @Test annotation but runs the testing method the specified number of times. Each test iteration can have it's own name, by using a combination of dynamic placeholders and static text. Currently available placeholders are:
{displayName}: display name of the@RepeatedTestmethod{currentRepetition}: the current repetition count{totalRepetitions}: the total number of repetitions
The default name of each iteration is "repetition {currentRepetition} of {totalRepetitions}".
//@RepeatedTest(5)
@DisplayName("Repeated Test")
@RepeatedTest(value = 5, name = "{displayName} -> {currentRepetition}")
void rptdTest(RepetitionInfo repetitionInfo) {
    int arbitrary = 2;
    System.out.println("Current iteration: " + repetitionInfo.getCurrentRepetition());

    assertEquals(arbitrary, repetitionInfo.getCurrentRepetition());
}
The RepetitionInfo parameter isn't necessary, but we can access it if we need that data. We get a clean display regarding each iteration when we run this:

@ParametrizedTest
Parameterized tests make it possible to run a test multiple times as well, but with different arguments.
It works similarly to @RepeatedTest so we won't go through everything again, just the differences.
You have to add at least one source that will provide the arguments for each iteration and then add a parameter of the required type to the method.
@ParameterizedTest
@ValueSource(ints = {6,8,2,9})
void lessThanTen(int number) {
    assertTrue(number < 10, "the number isn't less than 10");
}
The method will receive the array elements one by one:

@ValueSource is just one type of annotation that goes with @ParametrizedTest. For a list of other possibilities, check the documentation.
@Nested
This annotation lets us group tests where it makes sense to do so. We might want to separate tests that deal with addition from tests that deal with division, multiplication, etc; and it provides us with an easy way to @Disable certain groups entirely. It also lets us try and make full English sentences as our test output, making it extremely readable.
@DisplayName("The calculator class: ")
class CalculatorTest {
    Calculator calc;

    @BeforeEach
    void init() {
        calc = new Calculator();
    }

    @Nested
    @DisplayName("when testing addition, ")
    class Addition {
        @Test
        @DisplayName("with positive numbers ")
        void positive() {
            assertEquals(100, calc.add(1,1), "the result should be the sum of the arguments");
        }

        @Test
        @DisplayName("with negative numbers ")
        void negative() {
            assertEquals(100, calc.add(-1,-1), "the result should be the sum of the arguments");
        }
    }

    @Nested
    @DisplayName("when testing division, ")
    class Division {
        @Test
        @DisplayName("with 0 as the divisor ")
        void throwsAtZero() {
            assertThrows(ArithmeticException.class, () -> calc.divide(2,0), "the method should throw and ArithmeticException");
        }
    }
}

@TestInstance
This annotation is used only to annotate the test class with @TestInstance(Lifecycle.PER_CLASS) to tell JUnit to run all the test methods on a single instance of the test class, and not create a new instance of the class for every test method.
This let's us use class-level variables and share them among the test methods (generally not advised), like initializing resources outside of a @BeforeAll or @BeforeEach method and @BeforeAll and @AfterAll don't need to be static anymore. The "per-class" mode therefore also makes it possible to use @BeforeAll and @AfterAll methods in @Nested test classes.
Most of the things we can do with @TestInstance(Lifecycle.PER_CLASS) can be done with static variables. We have to be careful while resetting all the variables that need to be reset to a certain value in @BeforeEach, which are usually reset by the class being re-initialized every time.
Assumptions
Besides the aforementioned assertions, we have assumptions. When an assumption isn't true, the test isn't executed at all. Assumptions are typically used when it doesn't make sense to continue executing a test if certain conditions aren't met, and most often the property being tested is something external, not directly related to what we're testing. There are a few overloaded assumption methods:
assumeTrue(boolean assumption, optionalMsg)andassumeFalse(boolean assumption, optionalMsg)will only run the test if the providedassumptionis true and false, respectively. TheoptionalMsgwill be displayed only if the assumption isn't true.assumingThat(boolean assumption, Executable exec)- if theassumptionis true,execwill be executed, otherwise this method doesn't do anything.
A BooleanSupplier can be used instead of a regular boolean.
class CalculatorTest {

    Calculator calc;
    boolean bool;

    @BeforeEach
    void init() {
        System.out.println("inside @BeforeEach");
        bool = false;
        calc = new Calculator();
    }

    @Test
    void additionTest() {
        assumeTrue(bool, "Java sees this assumption isn't true -> stops executing the test.");
        System.out.println("inside additionTest");
        assertAll(
                () -> assertEquals(2, calc.add(1,1), "Doesn't add two positive numbers properly"),
                () -> assertEquals(0, calc.add(-1,1), "Doesn't add a negative and a positive number properly"),
                () -> assertNotNull(calc, "The calc variable should be initialized"));
    }

    @Test
    void divisionTest() {
        assumeFalse(0 > 5, "This message won't be displayed, and the test will proceed");
        assumingThat(!bool, () -> System.out.println("\uD83D\uDC4C"));
        System.out.println("inside divisionTest");
        assertThrows(ArithmeticException.class, () -> calc.divide(2,0));
    }
}
Which would give us the output:
inside @BeforeEach
👌
inside divisionTest


inside @BeforeEach


org.opentest4j.TestAbortedException: Assumption failed: Java sees this assumption isn't true -> stops executing the test.
Conclusion and Tips
Most of us test code by manually running the code, entering some input or clicking some buttons and checking the output. These "tests" are usually one common case scenario and a bunch of edge cases that we can think of. This is relatively fine with small projects but it becomes completely wasteful on anything bigger. Testing a particular method is particularly bad - we either System.out.println() the output and check it, or run it through some if statements to see whether it fits the expectation, then we change the code whenever we want to check what happens when we pass other arguments to the method. We visually, manually scan for anything unusual.
JUnit gives us a clean way of managing our test cases and separates the testing of the code from the code itself. It lets us keep track of everything that needs to be tested, and shows us what doesn't work in a neat way.
Generally, you want to test the common case of everything you can. Even simple, straight-forward methods, just to make sure they're working as they should. This might even be the most important part of automated testing - since whenever you change something in your code, or add a new module, you can run the tests to see whether you've broken the code or not, to see whether everything still works as it did before the "improvement". Of course, edge-cases are also important, especially for more complex methods.
Whenever you find a bug in your code, it's a very good idea to write a test for it before fixing the issue. This will make sure that if the bug occurs again, you won't need to spend time figuring out what went wrong again. A test will simply fail and you'll know where the issue is.

