
Introduction
Databases are a crucial part of modern applications since they store the data used to power them. Generally, we use the Structured Query Language (SQL) to perform queries on the database and manipulate the data inside of it. Though initially done via dedicated SQL tools, we've quickly moved to using SQL from within applications to perform queries.
Naturally, as time passed, Object Relational Mappers (ORMs) came to be - which enable us to safely, easily and conveniently connect to our database programmatically without needing to actually run queries to manipulate the data.
One such ORM is SQLAlchemy. In this post, we will delve deeper into ORMs and specifically SQLAlchemy, then use it to build a database-driven web application using the Flask framework.
What is an ORM and why use it?
Object-relational mapping, as the name suggests, maps objects to relational entities. In object-oriented programming languages, objects aren't that different from relational entities - they have certain fields/attributes that can be mapped interchangeably.
That being said, as it's fairly easy to map an object to a database, the reverse is also very simple. This eases the process of developing software and reduces the chances of making manual mistakes when writing plain SQL code.
Another advantage of using ORMs is that they help us write code that adheres to the DRY (Don't Repeat Yourself) principles by allowing us to use our models to manipulate data instead of writing SQL code every time we need to access the database.
ORMs abstract databases from our application, enabling us to use multiple or switch databases with ease. Say, if we used SQL in our application to connect to a MySQL database, we would need to modify our code if we were to switch to an MSSQL database since they differ in syntax.
If our SQL was integrated at multiple points in our application, this will prove to be quite the hassle. Through an ORM, the changes we would need to make would be limited to just changing a couple of configuration parameters.
Even though ORMs make our life easier by abstracting the database operations, we need to be careful to not forget what is happening under the hood as this will also guide how we use ORMs. We also need to be familiar with ORMs and learn them in order to use them more efficiently and this introduces a bit of a learning curve.
SQLAlchemy ORM
SQLAlchemy is an ORM written in Python to give developers the power and flexibility of SQL, without the hassle of really using it.
SQLAlchemy wraps around the Python Database API (Python DBAPI) which ships with Python and was created to facilitate the interaction between Python modules and databases.
The DBAPI was created to establish consistency and portability when it came to database management though we will not need to interact with it directly as SQLAlchemy will be our point of contact.
It is also important to note that the SQLAlchemy ORM is built on top of SQLAlchemy Core - which handles the DBAPI integration and implements SQL. In other words, SQLAlchemy Core provides the means to generate SQL queries.
While SQLAlchemy ORM makes our applications database-agnostic, it is important to note that specific databases will require specific drivers to connect to them. One good example is Pyscopg which is a PostgreSQL implementation of the DBAPI which when used in conjunction with SQLAlchemy allows us to interact with Postgres databases.
For MySQL databases, the PyMySQL library offers the DBAPI implementation require to interact with them.
SQLAlchemy can also be used with Oracle and the Microsoft SQL Server. Some big names in the industry that rely on SQLAlchemy include Reddit, Yelp, DropBox and Survey Monkey.
Having introduced the ORM, let us build a simple Flask API that interacts with a Postgres database.
Flask with SQLAlchemy
Flask is a lightweight micro-framework that is used to build minimal web applications and through third-party libraries, we can tap into its flexibility to build robust and feature-rich web applications.
In our case, we will build a simple RESTful API and use the Flask-SQLAlchemy extension to connect our API to a Postgres database.
Prerequisites
We will use PostgreSQL (also known as Postgres) to store our data that will be handled and manipulated by our API.
To interact with our Postgres database, we can use the command line or clients that come equipped with graphical user interfaces making them easier to use and much faster to navigate.
For Mac OS, I recommend using Postico which is quite simple and intuitive and provides a clean user interface.
PgAdmin is another excellent client that supports all major operating systems and even provides a Dockerized version.
We will use these clients to create the database and also view the data during the development and execution of our application.
With the installations out of the way, let us create our environment and install the dependencies we will need for our application:
$ virtualenv --python=python3 env --no-site-packages
$ source env/bin/activate
$ pip install psycopg2-binary
$ pip install flask-sqlalchemy
$ pip install Flask-Migrate
The above commands will create and activate a virtualenv, install the Psycopg2 driver, install flask-sqlalchemy, and install Flask-Migrate to handle database migrations.
Flask-Migrate uses Alembic, which is a light database migration tool that helps us interact with our database in a much clearer way by helping us create and recreate databases, move data into and across databases, and identify the state of our database.
In our case, we will not have to recreate the database or tables every time our application starts and will do that automatically for us in case neither exists.
Implementation
We will build a simple API to handle and manipulate information about cars. The data will be stored in a PostgreSQL database and through the API we will perform CRUD operations.
First, we have to create the cars_api database using our PostgreSQL client of choice:

With the database in place, let's connect to it. We'll start by bootstrapping our Flask API in the apps.py file:
from flask import Flask

app = Flask(__name__)

@app.route('/')
def hello():
    return {"hello": "world"}

if __name__ == '__main__':
    app.run(debug=True)
We start by creating a Flask application and a single endpoint that returns a JSON object.
For our demo, we will be using Flask-SQLAlchemy which is an extension specifically meant to add SQLAlchemy functionality to Flask applications.
Let us now integrate Flask-SQLAlchemy and Flask-Migrate into our app.py and create a model that will define the data about our cars that we will store:
# Previous imports remain...
from flask_sqlalchemy import SQLAlchemy
from flask_migrate import Migrate

app = Flask(__name__)
app.config['SQLALCHEMY_DATABASE_URI'] = "postgresql://postgres:postgres@localhost:5432/cars_api"
db = SQLAlchemy(app)
migrate = Migrate(app, db)

class CarsModel(db.Model):
    __tablename__ = 'cars'

    id = db.Column(db.Integer, primary_key=True)
    name = db.Column(db.String())
    model = db.Column(db.String())
    doors = db.Column(db.Integer())

    def __init__(self, name, model, doors):
        self.name = name
        self.model = model
        self.doors = doors

    def __repr__(self):
        return f"<Car {self.name}>"
After importing flask_sqlalchemy, we start by adding the database URI to our application's config. This URI contains our credentials, the server address, and the database that we will use for our application.
We then create a Flask-SQLAlchemy instance called db and used for all our database interactions. The Flask-Migrate instance, called migrate, is created after that and will be used to handle the migrations for our project.
The CarsModel is the model class that will be used to define and manipulate our data. The attributes of the class represent the fields we want to store in the database.
We define the name of the table by using the __tablename__ alongside the columns containing our data.
Flask ships with a command line interface and dedicated commands. For instance, to start our application, we use the command flask run. To tap into this script, we just need to define an environment variable that specifies the script that hosts our Flask application:
$ export FLASK_APP=app.py
$ flask run
 * Serving Flask app "app.py" (lazy loading)
 * Environment: development
 * Debug mode: on
 * Running on http://127.0.0.1:5000/ (Press CTRL+C to quit)
 * Restarting with stat
 * Debugger is active!
 * Debugger PIN: 172-503-577
With our model in place, and Flask-Migrate integrated, let's use it to create the cars table in our database:
Check out our hands-on, practical guide to learning Git, with best-practices, industry-accepted standards, and included cheat sheet. Stop Googling Git commands and actually learn it!
$ flask db init
$ flask db migrate
$ flask db upgrade
We start by initializing the database and enabling migrations. The generated migrations are just scripts that define the operations to be undertaken on our database. Since this is the first time, the script will just generate the cars table with columns as specified in our model.
The flask db upgrade command executes the migration and creates our table:

In case we add, delete, or change any columns, we can always execute the migrate and upgrade commands to reflect these changes in our database too.
Creating and Reading Entities
With the database in place and connected to our app, all that's left is to implement the CRUD operations. Let's start off with creating a car, as well as retrieving all currently existing ones:
# Imports and CarsModel truncated

@app.route('/cars', methods=['POST', 'GET'])
def handle_cars():
    if request.method == 'POST':
        if request.is_json:
            data = request.get_json()
            new_car = CarsModel(name=data['name'], model=data['model'], doors=data['doors'])
            db.session.add(new_car)
            db.session.commit()
            return {"message": f"car {new_car.name} has been created successfully."}
        else:
            return {"error": "The request payload is not in JSON format"}

    elif request.method == 'GET':
        cars = CarsModel.query.all()
        results = [
            {
                "name": car.name,
                "model": car.model,
                "doors": car.doors
            } for car in cars]

        return {"count": len(results), "cars": results}
We begin by defining a /cars route which accepts both GET and POST requests. The GET request will return a list of all cars stored in our database while the POST method will receive a car's data in JSON format and populate our database with the information provided.
To create a new car, we use the CarsModel class and provide the information required to fill in the columns for our cars table. After creating a CarsModel object, we create a database session and add our car to it.
To save our car to the database, we commit the session through db.session.commit() which closes the DB transaction and saves our car.
Let's try adding a car using a tool like Postman:

The response message notifies us that our car has been created and saved in the database:

You can see that there is now a record of the car in our database.
With the cars saved in our database, the GET request will help us fetch all the records. We query all the cars stored in our database by using the CarsModel.query.all() function, which is provided by Flask-SQLAlchemy.
This returns a list of CarsModel objects, which we then format and add to a list using a list comprehension and pass it to the response alongside the number of cars in our database. When we request for the list of cars through the API in Postman:
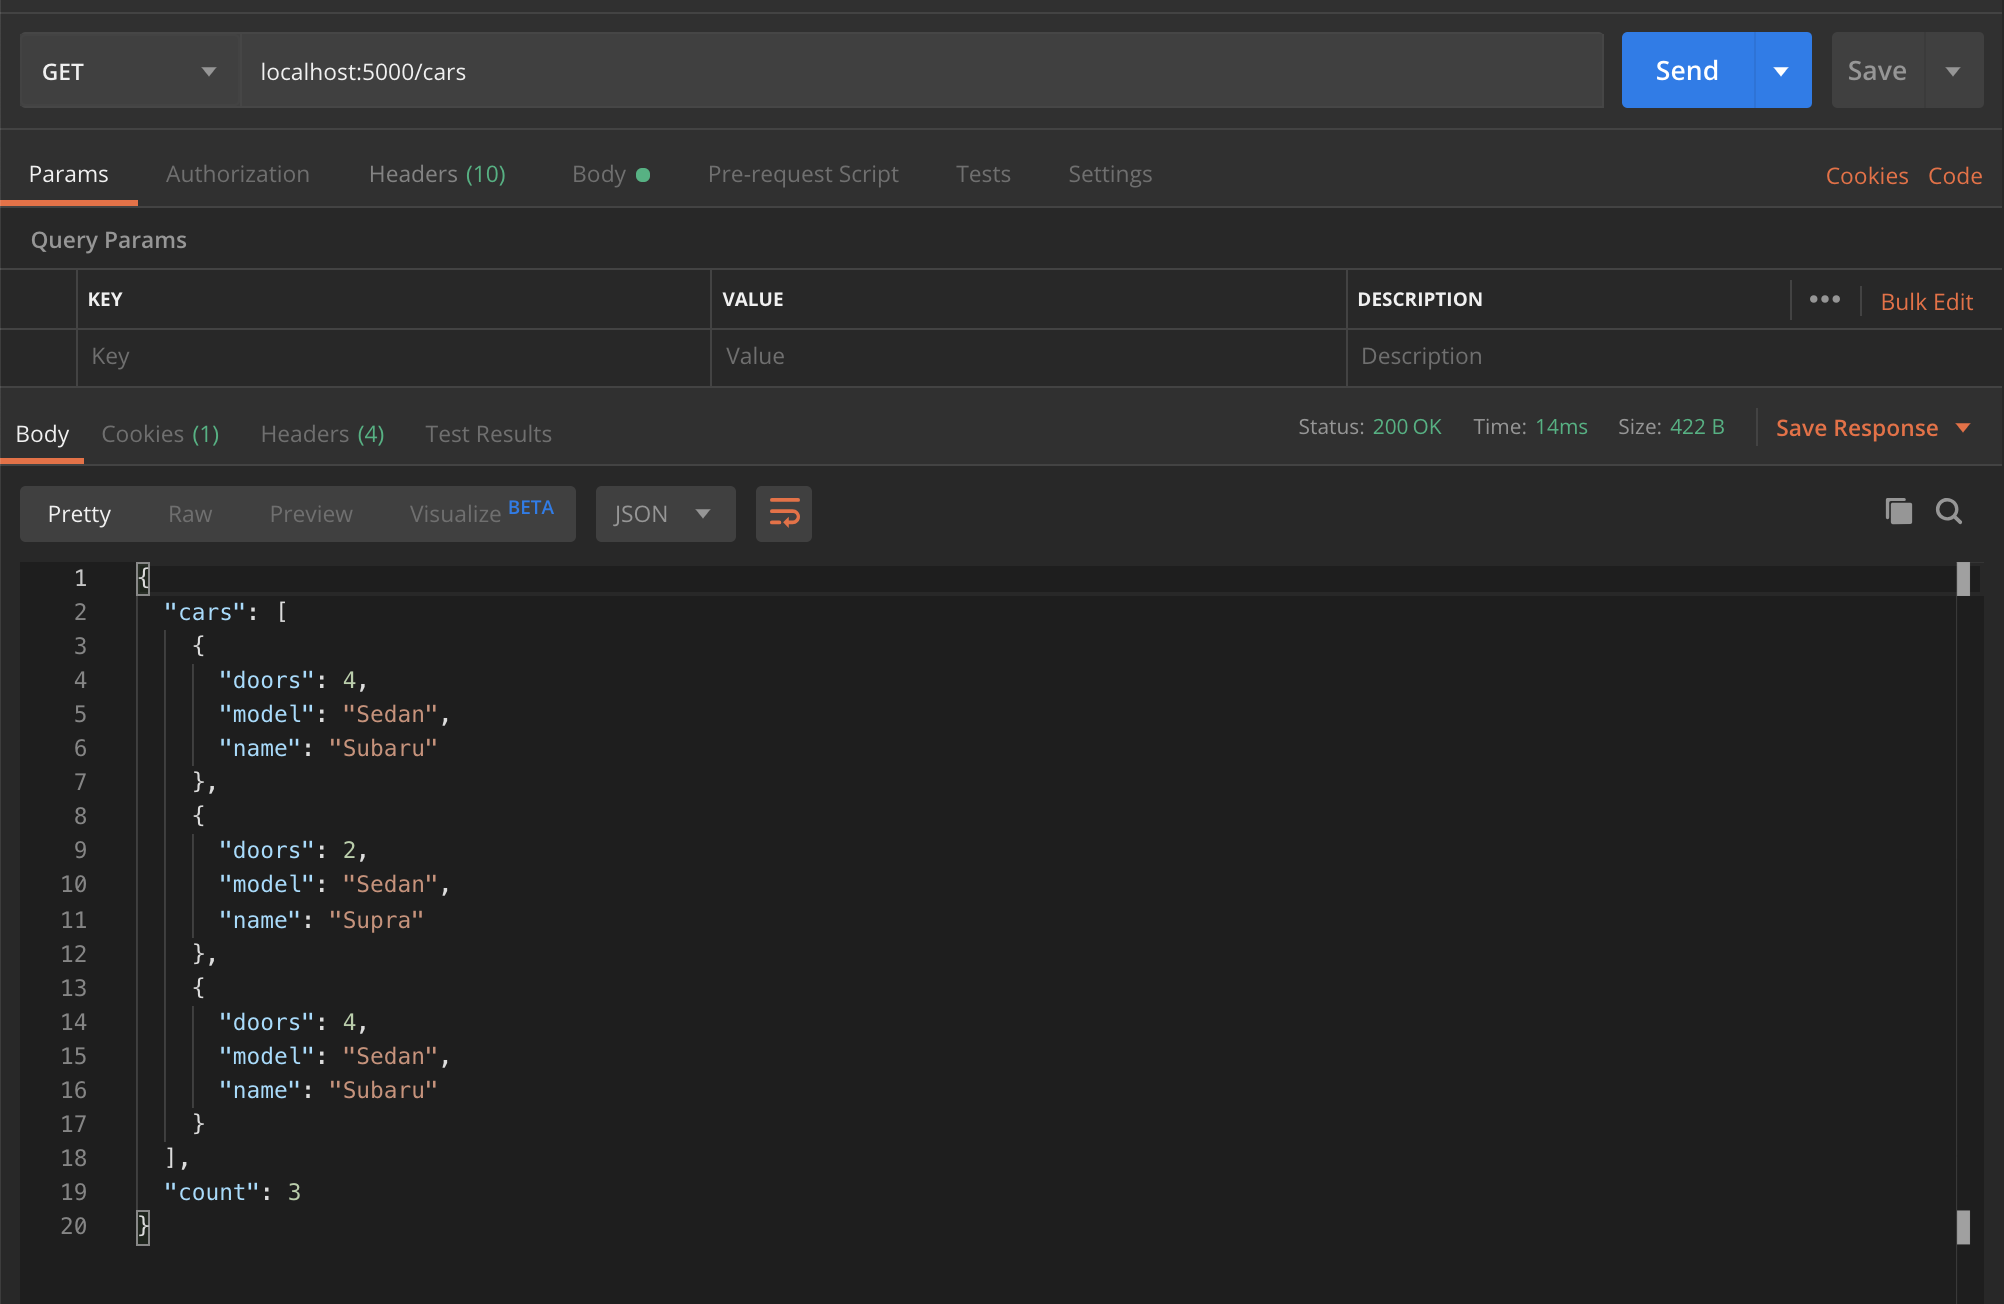
The GET method on the /cars endpoint returns the list of cars as they appear in our database, as well as the total count.
Note: Notice how there's not a single SQL query present in the code. SQLAlchemy takes care of that for us.
Updating and Deleting Entities
So far, we can create a single car and get a list of all cars stored in the database. To complete the set of CRUD operations on cars in our API, we need to add functionality to return the details, modify, and delete a single car.
The HTTP methods/verbs that we will use to achieve this will be GET, PUT, and DELETE, which will be brought together in a single method called handle_car():
# Imports, Car Model, handle_cars() method all truncated

@app.route('/cars/<car_id>', methods=['GET', 'PUT', 'DELETE'])
def handle_car(car_id):
    car = CarsModel.query.get_or_404(car_id)

    if request.method == 'GET':
        response = {
            "name": car.name,
            "model": car.model,
            "doors": car.doors
        }
        return {"message": "success", "car": response}

    elif request.method == 'PUT':
        data = request.get_json()
        car.name = data['name']
        car.model = data['model']
        car.doors = data['doors']
        db.session.add(car)
        db.session.commit()
        return {"message": f"car {car.name} successfully updated"}

    elif request.method == 'DELETE':
        db.session.delete(car)
        db.session.commit()
        return {"message": f"Car {car.name} successfully deleted."}
Our method handle_car() receives the car_id from the URL and gets the car object as it is stored in our database. If the request method is GET, the car details will be simply returned:

To update the details of our car, we use the PUT method and not PATCH. Both methods can be used to update the details, however, the PUT method accepts an updated version of our resource and replaces the one that we have stored in the database.
The PATCH method simply modifies the one we have in our database without replacing it. Therefore, to update a CarsModel record in our database, we have to supply all the attributes of our car including the ones to be updated.
We use the details to modify our car object and commit these changes using db.session.commit() and then return a response to the user:

Our car has been successfully updated.
Lastly, to delete a car, we send a DELETE request to the same endpoint. With the CarsModel object already queried, all we will need to do is use the current session to delete it by executing db.session.delete(car) and committing our transaction to reflect our changes on the database:

Conclusion
Real life applications are not as simple as ours and usually handle data that is related and spread across multiple tables.
SQLAlchemy allows us to define relationships and manipulate related data as well. More information on handling relationships can be found in the official Flask-SQLAlchemy documentation.
Our application can easily be extended to accommodate relationships and even more tables. We can also connect to multiple databases using Binds. More information on Binds can be found in the Binds documentation page.
In this post we have introduced ORMs and specifically the SQLAlchemy ORM. Using Flask and Flask-SQLAlchemy, we have created a simple API that exposes and handles data about cars as stored in a local PostgreSQL database.
The source code for the project in this post can be found on GitHub.

