
Introduction
Following the previous article, Understanding OpenGL through Python where we've set the foundation for further learning, we can jump into OpenGL using PyGame and PyOpenGL.
PyOpenGL is the standardized library used as a bridge between Python and the OpenGL APIs, and PyGame is a standardized library used for making games in Python. It offers built-in handy graphical and audio libraries and we'll be using it to render the result more easily at the end of the article.
As mentioned in the previous article, OpenGL is very old so you won't find many tutorials online on how to properly use it and understand it because all of the top dogs are already knee-deep in new technologies.
In this article, we'll jump into several fundamental topics you'll need to know:
- Initializing a Project Using PyGame
- Drawing Objects
- Iterative Animation
- Utilizing Transformation Matrices
- Multiple Transformation Execution
- Implementation Example
Initializing a Project Using PyGame
First off, we need to install PyGame and PyOpenGL if you haven't already:
$ python3 -m pip install -U pygame --user
$ python3 -m pip install PyOpenGL PyOpenGL_accelerate
Note: You can find a more detailed installation in the previous OpenGL article.
If you have problems concerning the installation, PyGame's "Getting Started" section might be a good place to visit.
Since there's no point in unloading 3 books worth of graphics theory on you, we'll be using the PyGame library to give us a head start. It will essentially just shorten the process from project initialization to actual modeling and animating.
To start off, we need to import everything necessary from both OpenGL and PyGame:
import pygame as pg
from pygame.locals import *

from OpenGL.GL import *
from OpenGL.GLU import *
Next, we get to the initialization:
pg.init()
windowSize = (1920,1080)
pg.display.set_mode(display, DOUBLEBUF|OPENGL)
While the initialization is only three lines of code, each deserves at least a simple explanation:
pg.init(): Initialization of all the PyGame modules - this function is a godsendwindowSize = (1920, 1080): Defining a fixed window sizepg.display.set_mode(display, DOUBLEBUF|OPENGL): Here, we specify that we'll be using OpenGL with double buffering
Double buffering means that there are two images at any given time - one that we can see and one that we can transform as we see fit. We get to see the actual change caused by the transformations when the two buffers swap.
Since we have our view-port set up, next we need to specify what we'll be seeing, or rather where the "camera" will be placed, and how far and wide it can see.
This is known as the frustum - which is just a cut off pyramid that visually represents the camera's sight (what it can and can't see).
A frustum is defined by 4 key parameters:
- The FOV (Field of View): Angle in degrees
- The Aspect Ratio: Defined as the ratio of the width and height
- The z coordinate of the near Clipping Plane: The minimum draw distance
- The z coordinate of the far Clipping Plane: The maximum draw distance
So, let's go ahead and implement the camera with these parameters in mind, using OpenGL C code:
void gluPerspective(GLdouble fovy, GLdouble aspect, GLdouble zNear, GLdouble zFar);
gluPerspective(60, (display[0]/display[1]), 0.1, 100.0)
To better understand how a frustum works, here's a reference picture:
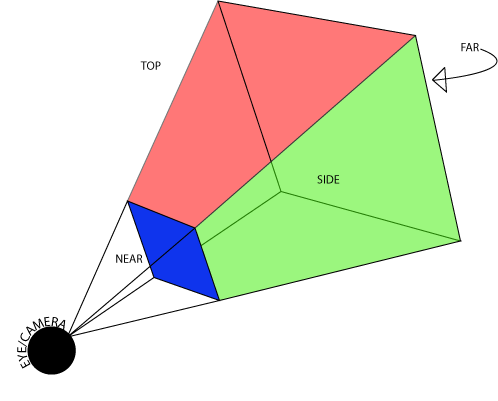
Near and far planes are used for better performance. Realistically, rendering anything outside our field of vision is a waste of hardware performance that could be used to render something that we can actually see.
So everything that the player can't see is implicitly stored in memory, even though it isn't visually present. Here's a great video of how rendering only within the frustum looks like.
Drawing Objects
After this setup, I imagine we're asking ourselves the same question:
Well this is all fine and dandy, but how do I make a Super Star Destroyer?
Well... with dots. Every model in an OpenGL object is stored as a set of vertices and a set of their relations (which vertices are connected). So theoretically if you knew the position of every single dot that is used to draw a Super Star Destroyer, you could very well draw one!
There are a few ways we can model objects in OpenGL:
- Drawing using vertices, and depending on how OpenGL interprets these vertices, we can draw with:
- points: as in literal points that are not connected in any way
- lines: every pair of vertices constructs a connected line
- triangles: every three vertices make a triangle
- quadrilateral: every four vertices make a quadrilateral
- polygon: you get the point
- many more...
- Drawing using the built in shapes and objects that were painstakingly modeled by OpenGL contributors
- Importing fully modeled objects
So, to draw a cube for example, we first need to define its vertices:
cubeVertices = ((1,1,1),(1,1,-1),(1,-1,-1),(1,-1,1),(-1,1,1),(-1,-1,-1),(-1,-1,1),(-1, 1,-1))

Then, we need to define how they're all connected. If we want to make a wire cube, we need to define the cube's edges:
cubeEdges = ((0,1),(0,3),(0,4),(1,2),(1,7),(2,5),(2,3),(3,6),(4,6),(4,7),(5,6),(5,7))
This is pretty intuitive - the point 0 has an edge with 1, 3, and 4. The point 1 has an edge with points 3, 5, and 7, and so on.
And if we want to make a solid cube, then we need to define the cube's quadrilaterals:
cubeQuads = ((0,3,6,4),(2,5,6,3),(1,2,5,7),(1,0,4,7),(7,4,6,5),(2,3,0,1))
This is also intuitive - to make a quadrilateral on the top side of the cube, we'd want to "color" everything in-between the points 0, 3, 6, and 4.
Keep in mind there's an actual reason we label the vertices as indexes of the array they're defined in. This makes writing code that connects them very easy.
The following function is used to draw a wired cube:
Check out our hands-on, practical guide to learning Git, with best-practices, industry-accepted standards, and included cheat sheet. Stop Googling Git commands and actually learn it!
def wireCube():
    glBegin(GL_LINES)
    for cubeEdge in cubeEdges:
        for cubeVertex in cubeEdge:
            glVertex3fv(cubeVertices[cubeVertex])
    glEnd()
glBegin() is a function that indicates we'll define the vertices of a primitive in the code below. When we're done defining the primitive, we use the function glEnd().
GL_LINES is a macro that indicates we'll be drawing lines.
glVertex3fv() is a function that defines a vertex in space, there are a few versions of this function, so for the sake of clarity let's look at how the names are constructed:
glVertex: a function that defines a vertexglVertex3: a function that defines a vertex using 3 coordinatesglVertex3f: a function that defines a vertex using 3 coordinates of typeGLfloatglVertex3fv: a function that defines a vertex using 3 coordinates of typeGLfloatwhich are put inside a vector (tuple) (the alternative would beglVertex3flwhich uses a list of arguments instead of a vector)
Following similar logic, the following function is used to draw a solid cube:
def solidCube():
    glBegin(GL_QUADS)
    for cubeQuad in cubeQuads:
        for cubeVertex in cubeQuad:
            glVertex3fv(cubeVertices[cubeVertex])
    glEnd()
Iterative Animation
For our program to be "killable" we need to insert the following code snippet:
for event in pg.event.get():
    if event.type == pg.QUIT:
        pg.quit()
        quit()
It's basically just a listener that scrolls through PyGame's events, and if it detects that we clicked the "kill window" button, it quits the application.
We'll cover more of PyGame's events in a future article - this one was introduced right away because it would be quite uncomfortable for users and yourselves to have to fire up the task manager every time they want to quit the application.
In this example, we'll be using double buffering, which just means that we'll be using two buffers (you can think of them as canvases for drawing) which will swap in fixed intervals and give the illusion of motion.
Knowing this, our code has to have the following pattern:
handleEvents()
glClear(GL_COLOR_BUFFER_BIT|GL_DEPTH_BUFFER_BIT)
doTransformationsAndDrawing()
pg.display.flip()
pg.time.wait(1)
glClear: Function that clears the specified buffers (canvases), in this case, the color buffer (which contains color information for drawing the generated objects) and depth buffer (a buffer which stores in-front-of or in-back-of relations of all the generated objects).pg.display.flip(): Function that updated the window with the active buffer contentspg.time.wait(1): Function that pauses the program for a period of time
glClear has to be used because if we don't use it, we'll be just painting over an already painted canvas, which in this case, is our screen and we're going to end up with a mess.
Next, if we want to continuously update our screen, just like an animation, we have to put all our code inside a while loop in which we:
- Handle events (in this case, just quitting)
- Clear the color and depth buffers so that they can be drawn on again
- Transform and draw objects
- Update the screen
- GOTO 1.
The code ought to look something like this:
while True:
    handleEvents()
    glClear(GL_COLOR_BUFFER_BIT|GL_DEPTH_BUFFER_BIT)
    doTransformationsAndDrawing()
    pg.display.flip()
    pg.time.wait(1)
Utilizing Transformation Matrices
In the previous article, we explained how, in theory, we need to construct a transformation that has a referral point.
OpenGL works the same way, as can be seen in the following code:
glTranslatef(1,1,1)
glRotatef(30,0,0,1)
glTranslatef(-1,-1,-1)
In this example, we did a z-axis rotation in the xy-plane with the center of rotation being (1,1,1) by 30 degrees.
Let's have a little refresher if these terms sound a bit confusing:
- z-axis rotation means that we're rotating around the z-axis
This just means we're approximating a 2D plane with a 3D space, this whole transformation is basically like doing a normal rotation around a referral point in 2D space.
- We get the xy-plane by squashing an entire 3D space into a plane that has
z=0(we eliminate the z parameter in every way) - Center of rotation is a vertex around which we will be rotating a given object (the default center of rotation is the origin vertex
(0,0,0))
But there's a catch - OpenGL understands the code above by constantly remembering and modifying one global transformation matrix.
So when you write something in OpenGL, what you're saying is:
# This part of the code is not translated
# transformation matrix = E (neutral)
glTranslatef(1,1,1)
# transformation matrix = TxE
# ALL OBJECTS FROM NOW ON ARE TRANSLATED BY (1,1,1)
As you might imagine, this poses a huge problem, because sometimes we want to utilize a transformation on a single object, not on the whole source code. This is a very common reason for bugs in low-level OpenGL.
To combat this problematic feature of OpenGL, we're presented with pushing and popping transformation matrices - glPushMatrix() and glPopMatrix():
# Transformation matrix is T1 before this block of code
glPushMatrix()
glTranslatef(1,0,0)
generateObject() # This object is translated
glPopMatrix()
generateSecondObject() # This object isn't translated
These work in a simple Last-in-First-Out (LIFO) principle. When we wish to perform a translation to a matrix, we first duplicate it and then push it on top of the stack of the transformation matrices.
In other words, it isolates all the transformations we're performing in this block by creating a local matrix that we can scrap after we're done.
Once the object is translated, we pop the transformation matrix from the stack, leaving the rest of the matrices untouched.
Multiple Transformation Execution
In OpenGL, as previously mentioned, transformations are added to the active transformation matrix that's on top of the stack of transformation matrices.
This means that the transformations are executed in reverse order. For example:
######### First example ##########
glTranslatef(-1,0,0)
glRotatef(30,0,0,1)
drawObject1()
##################################

######## Second Example #########
glRotatef(30,0,0,1)
glTranslatef(-1,0,0)
drawObject2()
#################################
In this example, Object1 is first rotated, then translated, and Object2 is first translated, and then rotated. The last two concepts won't be used in the implementation example, but will be practically used in the next article in the series.
Implementation Example
The code below draws a solid cube on the screen and continuously rotates it by 1 degree around the (1,1,1) vector. And it can be very easily modified to draw a wire cube by swapping out the cubeQuads with the cubeEdges:
import pygame as pg
from pygame.locals import *

from OpenGL.GL import *
from OpenGL.GLU import *

cubeVertices = ((1,1,1),(1,1,-1),(1,-1,-1),(1,-1,1),(-1,1,1),(-1,-1,-1),(-1,-1,1),(-1,1,-1))
cubeEdges = ((0,1),(0,3),(0,4),(1,2),(1,7),(2,5),(2,3),(3,6),(4,6),(4,7),(5,6),(5,7))
cubeQuads = ((0,3,6,4),(2,5,6,3),(1,2,5,7),(1,0,4,7),(7,4,6,5),(2,3,0,1))

def wireCube():
    glBegin(GL_LINES)
    for cubeEdge in cubeEdges:
        for cubeVertex in cubeEdge:
            glVertex3fv(cubeVertices[cubeVertex])
    glEnd()

def solidCube():
    glBegin(GL_QUADS)
    for cubeQuad in cubeQuads:
        for cubeVertex in cubeQuad:
            glVertex3fv(cubeVertices[cubeVertex])
    glEnd()

def main():
    pg.init()
    display = (1680, 1050)
    pg.display.set_mode(display, DOUBLEBUF|OPENGL)

    gluPerspective(45, (display[0]/display[1]), 0.1, 50.0)

    glTranslatef(0.0, 0.0, -5)

    while True:
        for event in pg.event.get():
            if event.type == pg.QUIT:
                pg.quit()
                quit()

        glRotatef(1, 1, 1, 1)
        glClear(GL_COLOR_BUFFER_BIT|GL_DEPTH_BUFFER_BIT)
        solidCube()
        #wireCube()
        pg.display.flip()
        pg.time.wait(10)

if __name__ == "__main__":
    main()
Running this piece of code, a PyGame window will pop up, rendering the cube animation:
Conclusion
There is a lot more to learn about OpenGL - lighting, textures, advanced surface modeling, composite modular animation, and much more.
But fret not, all of this will be explained in the following articles teaching the public about OpenGL the proper way, from the ground up.
And don't worry, in the next article, we'll actually draw something semi-decent.

